Sharing Projects with Clients
Last edited on 4 November 2024

Introduction
InQI has already eliminated the need for you, as a designer, to personally visit a new site. You already know almost everything you need to know about the project site, just by typing in the address and letting InQI do its magic.
Now with an
All you have to do is to send your client an
Your client will be fascinated by a 3D presentation of their property and watching your design being added to it in real-time.
They can create requests and reply to your questions all within the same platform.
Features
- Your client will be presented with a stylish 3D view of the project.
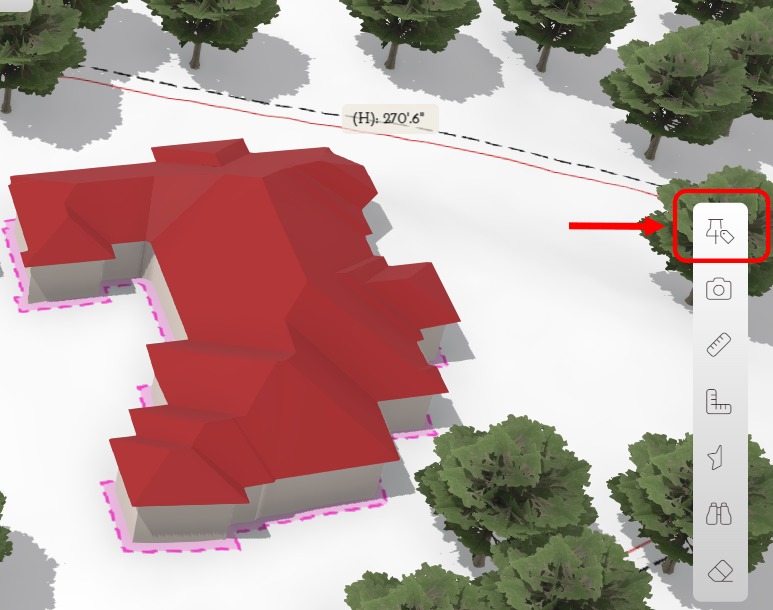
- InQI's 3D viewer is not just powerful and feature-rich; it is inch-precise. Just as an example, you could precisely show your client the shadow of their new ADU/Pergola on a specific hour of a specific day.
- Client can rotate the 3D view and see your design from various point of view. This feature enables your client to have a complete and precise preview of your design within their property.
- Client can see, in real-time, as you are creating new objects and building in their property.
- Client can create new requests by clicking on locations on the map. Then you, as the designer, can know precisely where on their property they are pointing at. No more confusion and misunderstandings while describing a construction request.
- The client does not have to be a registered InQI user. If they want, they can use their mobile devices from another country and another time-zone. All they need is an
InQI Sharing Link . Imagine the flexibility that this feature offers to both the Designer and the Client. - You can create multiple
InQI Sharing Links and share it with multiple clients/students. This is perfect for classrooms where a professor designs and students watch the progress on their own devices.
Clients
First step is to add your clients to your account.
To add clients, simply go to your dashboard and then click on the
From there, click on
After adding a few clients, you should have a list of clients that look like below.
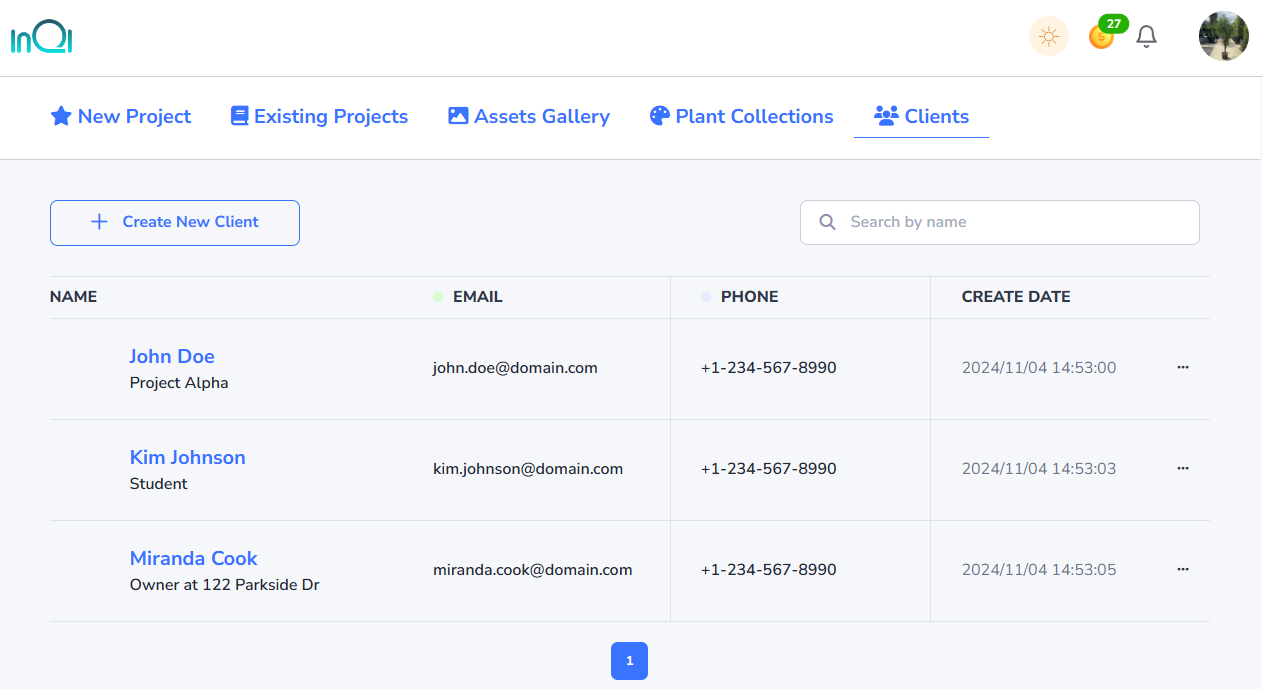
- Your client records will be available in all of your projects. So you create a client contant only once, but you can import and use this contact in any project that you create.
- You can always modify/remove a client from your list from here.
- Please make sure that you input a correct email address. Otherwise, your client will not receive an email than contains
InQI Sharing Links .
Sharing
Once you have your client list created, create a new project and then goto
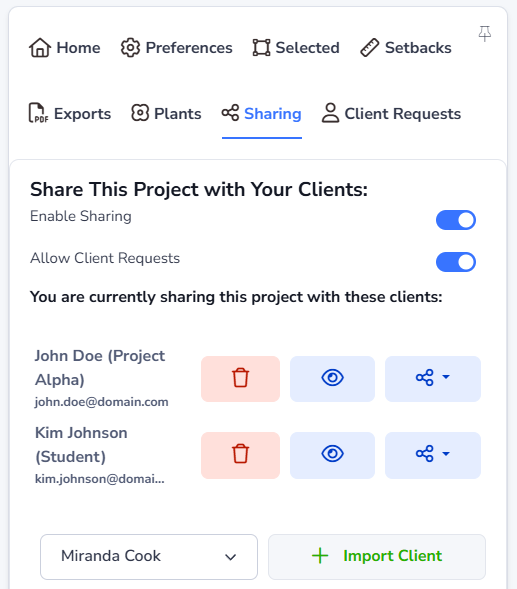
From here, you can import any number of your clients. A
You just need to share this link with your client in any way that suits you. You could click on the sharing icon in front of the client name and click on
InQI Sharing Link is all your client needs to have to start seeing live update of the project. When you save your project, everyone who hase this link will get an updated view of the project.- If you wish to temporarily disable sharing, simple turn of
Disable Sharing . This will not destroy the sharing link, but only temporarily pauses it. When you are ready again, you can turn it back on. - If you remove a client from the sharing list, the sharing link will be permanently destroyed. If you add the client back, a different sharing link will be generated. Then you would need to send your client the new link.
- You have the option to see the view that is being shared with your client. Simple click on the eye icon in front of the name of your client.
- InQI does not require your client to register an account with InQI. This is to make it as convenient as possible for your clients to use the system.
- You client does not need to be a tech-savy to work with InQI. In order to see a 3D view of their property and your awesome design, all they have to do is clicking on
InQI Sharing Link that you send them. They could use any device with any browser.
Client Requests
If you activate
When
Your client can create a request or a comment using this menu-item.
When they do that, you will see a new item showing up under your Client Request tab.
As an example, in below you can see two request items created by the customer.
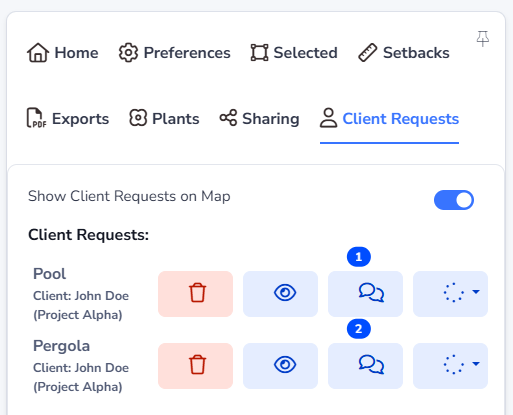
- You can show/hide the client requests on your view.
- You can mark a client request as Complete or as Ongoing.
- You can chat with the client to ask questions or answer to their questions. This helps with keeping track of the workflow and your client feedbacks.
 It looks like you have discovered a premium feature!
Upgrade your subscription to immediately gain access to this feature.
It looks like you have discovered a premium feature!
Upgrade your subscription to immediately gain access to this feature.