An introduction on Basic Parcel Modification
Last edited on 5 November 2024

Introduction
This article shows you all the tricks that will make your experience with the
The goal of this article is to show you the best practices to modify existing objects in the
Handling the Map View
When you open the
First trick is to use the mouse scroller wheel to zoom in and out in the
Also drag the map around by left-click + holding on it and moving the mouse. Make sure you are comfortable handling the
Selecting Existing Elements
Your new project comes preloaded with a number of existing objects such as Existing Roof Footprints, Pools, etc. These elements are generated by our AI. In a sense, they are guesses made by a machine. If you click on them, information about the object appears on the left window.
Note
There are two ways to select an element:
- Clicking on the border of the element (works for all objects)
- Clicking within the area of the object (works if the object is filled with solid color or a texture)
When you successfully select an element, an orange rectangle appears around the object. This confirms that the object is selected.
This is not the case for objects of type point, such as Plants, Trees, and Tags.
Modifying Elements
The machine (AI) creates the initial elements, so it is only natural if you as a designer would want to modify them.
The most important element to modify is the
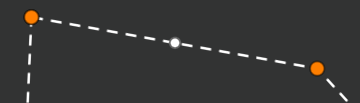
When you are in edit mode of an element, you see each line looking like the image above. Each line will have two orange dots at its ends and one smaller white dot in the middle. It may look simple, but only these three dots give you immense power to modify one simple line and create almost any shape that you wish. Here is a list of what you can do with these dots:
- Left-click + hold the orange dots to drag them around
- Right lick on the orange dots to delete them (if there are too many of them)
- Drag the white dot around to turn the line into two shorter lines
The white dot in the edit mode allows you to create any shape that you want on the Map View. With a little practice, you can master the modification process with these orange and white dots.
Keyboard Shortcuts
Following keyboard shortcuts are activated on the
| Delete | Delete selected objects |
| Esc | Cancel selection / Close massage windows |
| Ctrl + z | Undo |
| Ctrl + Shift + z | Redo |
| Ctrl + s | Save |
| Ctrl + Arrow Left | Move selected objects left |
| Ctrl + Arrow Up | Move selected objects up |
| Ctrl + Arrow Right | Move selected objects right |
| Ctrl + Arrow Down | Move selected objects down |
| Shift (hold) + Click | Group select objects |
Context Menu
Context menu appears when you right click on an object. This menu is customized base on the layer of the object that you clicked on. However, below is a list of all the actions that may appear in this menu.
| Delete | Deletes the object |
| Duplicate | Creates a copy of the object. The new object is placed slightly to the right side of the original object. |
| Convert to Sketch | Converts the object to a sketch object. This is useful when you want to use an existing object as an sketch object and add texture to it. |
| Transform | A wide range of transformations are available from this submenu. These include rotation, mirroring, smoothening and more. |
 It looks like you have discovered a premium feature!
Upgrade your subscription to immediately gain access to this feature.
It looks like you have discovered a premium feature!
Upgrade your subscription to immediately gain access to this feature.